Page 10 of 17
SU28.18 | Clinical Examination of Abdomen — SDL Guide
Learning Objectives
- Describe and demonstrate the systematic clinical examination of the abdomen using inspection, palpation, percussion and auscultation (SU28.18).
- Elicit and interpret the key abdominal signs — organomegaly, free fluid (shifting dullness and fluid thrill), masses and peritonism — and distinguish an enlarged spleen, kidney and intra-abdominal mass (SU28.18).
- Order relevant investigations driven by the examination findings and construct an appropriate, problem-oriented treatment plan (SU28.18).
INSTRUCTIONS
The clinical examination of the abdomen is one of the most frequently used and most rewarding bedside skills in medicine and surgery. Done in the same disciplined order every time — inspect, palpate, percuss, auscultate — it allows you to detect tenderness and peritonism, feel an enlarged organ or a mass, demonstrate free fluid, and decide what to do next. This module sets out the anatomy and preparation that make the examination reliable, walks through the four-step routine and the special signs, and then closes the loop from findings to the investigations and treatment plan they should drive. You will practise the sequence in simulation and on patients until it becomes automatic.
References
- Bailey & Love's Short Practice of Surgery, History and Examination of the Abdomen (textbook)
- SRB's Manual of Surgery, Examination of an Abdominal Case (textbook)
- Sabiston Textbook of Surgery, The Acute Abdomen (textbook)
Version 2.0 | NMC CBUC 2024
CLINICAL SCENARIO
A patient lies on the ward bed with vague abdominal fullness and a story that could mean almost anything. The senior registrar walks up, exposes the abdomen properly, watches it for a moment from the foot of the bed, then lays warm hands on it and works methodically from the least tender quadrant inwards. Within two minutes, without any scan, she has felt a firm mass in the left upper quadrant that she cannot get above and that moves down on breathing, percussed a dull band over it, and demonstrated shifting dullness in the flanks — and she turns to you and says, 'splenomegaly with ascites; let us get the bloods and an ultrasound'. The whole diagnosis came from a clean, ordered examination. That is the skill this module builds: a reproducible routine that turns a confusing abdomen into a clear problem and a sensible plan.
WHY THIS MATTERS
No investigation replaces a competent abdominal examination. It is the skill you will use every single day — in casualty to recognise the acute abdomen, on the ward round to follow a postoperative patient, and in clinic to assess a lump or an enlarged organ — and it is examined formally in every clinical assessment you will take, from the long case to the OSCE. A disciplined examination tells you where the problem is, whether the peritoneum is irritated, whether an organ is enlarged or a mass is present, and whether there is free fluid, and it is precisely these findings that decide which blood tests and which imaging to order and how urgently. Performed carelessly it misses serious disease or causes needless pain; performed well it is fast, gentle, reproducible and diagnostic. Mastering it now, by repetition, is one of the best investments a clinical student can make.
RECALL
Recall the surface anatomy that underpins the examination. The abdomen is conventionally divided into nine regions by two vertical mid-clavicular planes and two horizontal planes (the subcostal/transpyloric plane above and the transtubercular plane below), or more simply into four quadrants by a vertical and a horizontal line through the umbilicus; learn the organs that lie in each. Recall the surface markings of the viscera — the liver in the right hypochondrium reaching the epigastrium, the spleen under the left costal margin (not normally palpable until enlarged about threefold, when it descends towards the right iliac fossa), and the kidneys high in the loins. Recall from physiology that gas-filled bowel is resonant to percussion while solid organs, masses and fluid are dull, and that bowel sounds are produced by peristalsis. These anatomical and physiological facts are the reason each examination step yields the information it does.
Why a Disciplined Abdominal Examination Matters
The clinical indication for a thorough abdominal examination is essentially any patient with abdominal symptoms — pain, distension, vomiting, a mass, altered bowel habit, jaundice or weight loss — and any patient being assessed for an acute abdomen or followed after abdominal surgery. The reason it is performed in a fixed, systematic order is that the abdomen contains many organs in overlapping regions, and only a reproducible routine reliably detects the abnormal among the normal and lets one examiner's findings be compared with another's. A disciplined examination achieves three things at once: it localises the problem (which region, which organ), it characterises any abnormality (tenderness and peritonism, an enlarged organ, a mass, free fluid), and it directs the next step (which investigations, how urgently, and the outline of a treatment plan). It must be performed gently and considerately — with the patient's dignity preserved, pain anticipated and never provoked needlessly — because a rough examination both hurts the patient and produces unreliable signs as the patient guards. This first principle frames everything that follows: the anatomy and preparation set the stage, the four-step sequence is the method, the special signs are the interpretation, and the findings then drive investigation and management.
Governing Principles: Anatomy, Regions and Patient Preparation
Reliable signs depend on correct preparation, so set the examination up properly every time. Obtain consent and a chaperone, ensure good lighting and a warm room, and position the patient lying supine with one pillow, arms by the sides, and the abdomen exposed from the nipples to the mid-thigh (in practice from below the breasts to the symphysis, preserving dignity with appropriate draping). Stand on the patient's right side. Before touching the abdomen, ask where it hurts and watch the patient's face throughout, beginning palpation in the region furthest from the pain. Keep your hands and stethoscope warm. Orient yourself to the nine regions (right and left hypochondrium, epigastrium; right and left lumbar, umbilical; right and left iliac fossa, hypogastrium) or the four quadrants, and recall which organ underlies each so that a finding can be ascribed to a structure. These governing principles — consent, exposure, warmth, examining from the right, asking about pain first and starting away from it — are not mere etiquette; they are what make the subsequent signs reproducible and the examination painless. Skipping them is the commonest reason a student's examination yields unreliable findings.
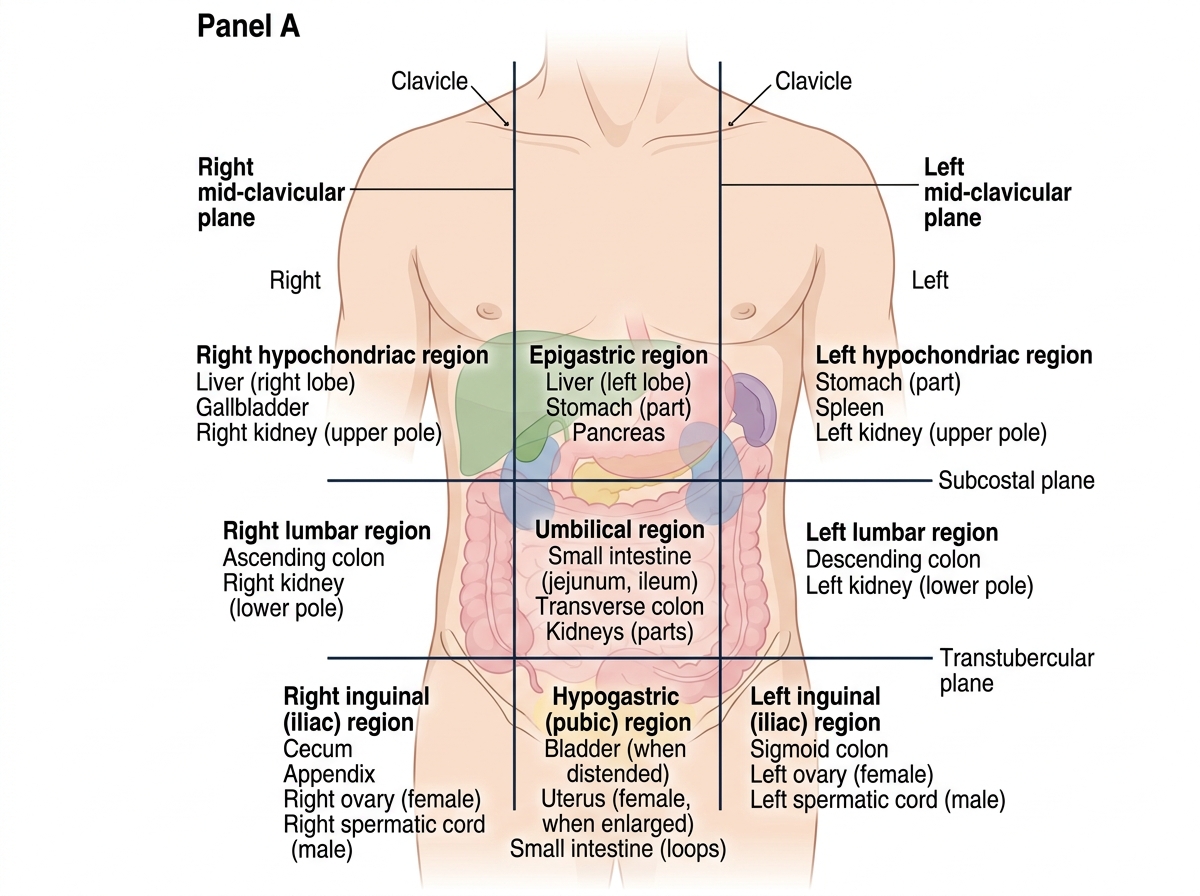
Nine Regions of the Anterior Abdominal Wall
SELF-CHECK
Before palpating the abdomen of a patient who complains of right iliac fossa pain, where should you begin palpation?
A. Directly over the most painful area to localise it quickly
B. In the region furthest from the pain, watching the patient's face
C. Deeply in all four quadrants simultaneously
D. Over the umbilicus regardless of the site of pain
Reveal Answer
Answer: B. In the region furthest from the pain, watching the patient's face
Palpation should always begin in the region FURTHEST from the site of pain and proceed gently towards it, while watching the patient's face. Starting over the painful area provokes guarding and pain, makes the patient lose confidence and renders the subsequent examination unreliable. Asking about the site of pain first and starting away from it is a governing principle of a gentle, reproducible examination.
The Examination Sequence: Inspect, Palpate, Percuss, Auscultate
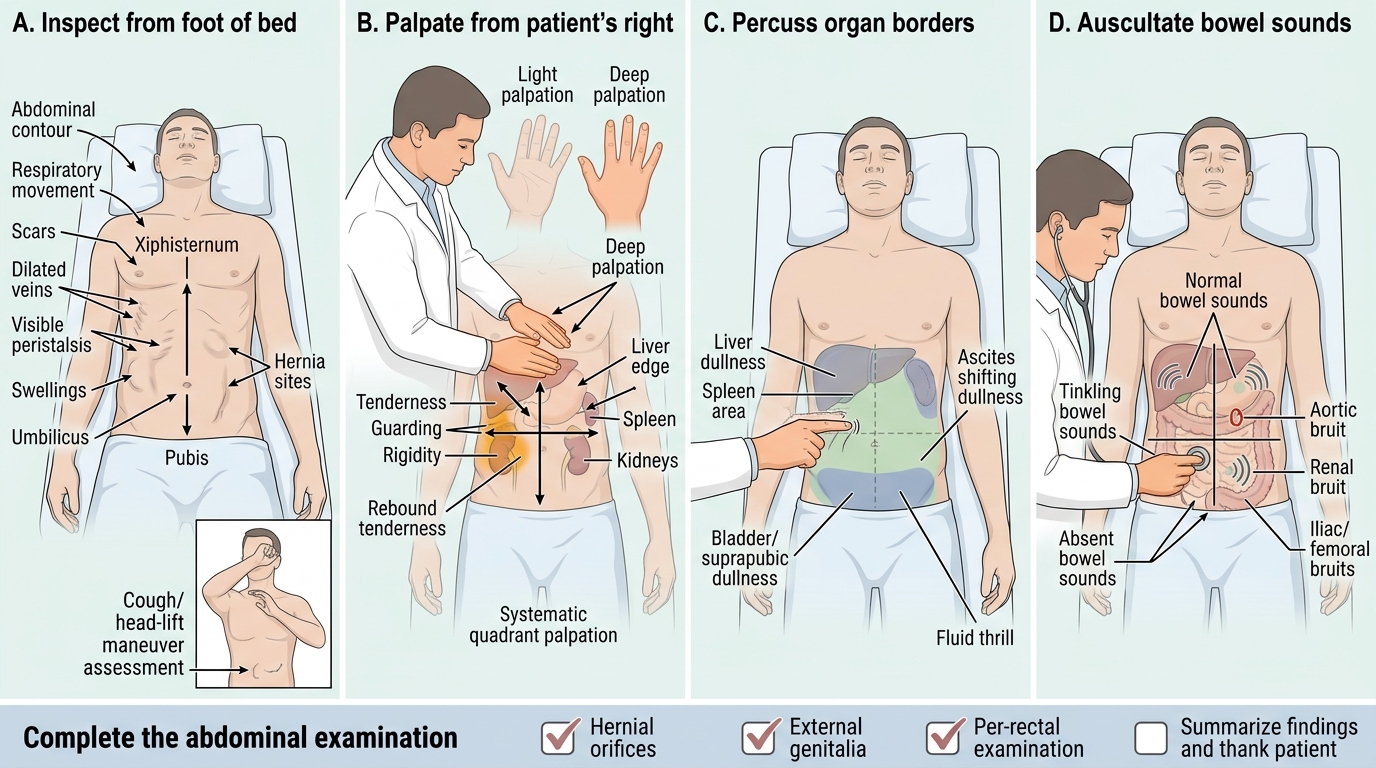
The examination proceeds through four steps in a fixed order, each adding information. Inspection comes first: look across the abdomen from the foot and the side for its contour (flat, distended, scaphoid), movement with respiration (a rigid abdomen moves little), scars, distended veins, visible peristalsis or pulsation, the umbilicus, and any obvious swelling or hernia (ask the patient to cough and to lift the head to bring out a hernia or divarication). Palpation follows, beginning with light palpation of all regions (starting away from the pain) to detect tenderness, guarding, rigidity and rebound and superficial masses, then deep palpation to define deeper masses and to palpate the organs — the liver (palpate from the right iliac fossa upwards, asking the patient to breathe in, feeling for the edge descending under your hand), the spleen (palpate from the right iliac fossa towards the left costal margin), and the kidneys (bimanual ballottement in the loin). Percussion then maps organ borders and the nature of masses (resonant gas vs dull solid/fluid), defines the upper and lower borders of the liver and any loss of liver dullness, and is the basis of the ascites signs. Auscultation assesses bowel sounds (normal, exaggerated/tinkling in obstruction, or absent in ileus/peritonitis) and listens for bruits over the aorta and renal arteries. The examination is then completed by examining the hernial orifices, external genitalia and a per-rectal examination — an abdominal examination is incomplete without them.
Four-Stage Abdominal Examination
- Inspect: contour, respiratory movement, scars, veins, peristalsis, swellings, umbilicus, hernias (cough/head-lift).
- Palpate: light (tenderness, guarding, rigidity, rebound) then deep (masses, liver, spleen, kidneys).
- Percuss: organ borders, liver dullness, resonant vs dull, ascites signs.
- Auscultate: bowel sounds (normal/tinkling/absent), bruits.
- Complete: hernial orifices, genitalia, per-rectal examination.